Omaha Beach
Omaha Beach was a 7,000 yard stretch of land between Vierville and Colleville, France. Units of the American V Corps were assigned to land at low tide at Omaha Beach at 6:30 a.m. on June 6th, 1944. Units participating in the assault on Omaha Beach included (but were not limited to):
- 8th Air Force
- 2nd Bombardment Division
- 2nd Combat Wing
- 14th Combat Wing
- 20th Combat Wing
- 2nd Bombardment Division
- Force 0
- 700 naval vessels
- Shore Bombardment Group
- 3 Battleships
- 4 Light Cruisers
- 12 Destroyers
- 1st Infantry Division
- 16th Infantry Regiment
- 1st Battalion
- 2nd Battalion
- 3rd Battalion
- 18th Infantry Regiment
- 1st Battalion
- 2nd Battalion
- 3rd Battalion
- 26th Infantry Regiment
- 2nd Battalion
- 7th Field Artillery Battalion
- 32nd Field Artillery Battalion
- 1st Engineer Combat Battalion
- 1st Military Police Platoon
- 1st Medical Battalion
- 16th Infantry Regiment
- 29th Infantry Division
- 115th Infantry Regiment
- 1st Battalion
- 2nd Battalion
- 3rd Battalion
- 116th Infantry Regiment
- 1st Battalion
- 2nd Battalion
- 3rd Battalion
- 175th Infantry Regiment
- 81st Chemical Mortar Battalion
- Company A
- Company B
- Company C
- Company D
- 104th Medical Battalion
- Company B
- 121st Engineer Combat Battalion
- 110th Field Artillery Battalion
- 111th Field Artillery Battalion
- 29th Reconnaissance Troop
- 29th Military Police Platoon
- 115th Infantry Regiment
- 2nd Ranger Battalion
- Company A (Task Force C)
- Company B (Task Force C)
- Company C (Task Force B)
- Company D (Task Force A)
- Company E (Task Force A)
- Company F (Task Force A)
- Headquarters Company (Task Force A)
- 5th Ranger Battalion
- Company A (Task Force C)
- Company B (Task Force C)
- Company C (Task Force C)
- Company D (Task Force C)
- Company E (Task Force C)
- Company F (Task Force C)
- 741st Tank Battalion
- Company A
- Company B
- Company C
- 743rd Tank Battalion
- Company A
- Company B
- Company C
- 745th Tank Battalion
- 81st Chemical Mortar Battalion
- Company A
- Company B
- Company C
- Company D
- 61st Signal Battalion
- 197th Antiaircraft Artillery Battalion
- 397th Antiaircraft Artillery Battalion
- 467th Antiaircraft Artillery Battalion
- 58th Armored Field Artillery Battalion
- 20th Engineer Combat Battalion
- 37th Engineer Combat Battalion
- 146th Engineer Combat Battalion
- 147th Engineer Combat Battalion
- 149th Engineer Combat Battalion
- 112th Engineer Combat Battalion
- 299th Engineer Combat Battalion
- 336th Engineer Combat Battalion
- 348th Engineer Combat Battalion
- 5th Engineer Special Brigade
- 37th Engineer Combat Battalion
- 336th Engineer Combat Battalion
- 348th Engineer Combat Battalion
- 21 U.S. Navy NCDUs
- 6th Naval Beach Battalion
- 7th Naval Beach Battalion
German defenders at Omaha Beach included:
- 352nd Infantry Division
- 914th Infantry Regiment
- 2 Battalions
- 915th Infantry Regiment
- 2 Battalions
- 916th Infantry Regiment
- 2 Battalions
- 1352nd Artillery Regiment
- 352nd Sturmgeschutze-Abeilung (reserve)
- 914th Infantry Regiment
- 716th Infantry Division
- 726th Infantry Regiment
- 736th Infantry Regiment
- 21st Panzer Division (reserve)
- 915th Regiment
- 1716th Artillery Regiment
- 2 Batteries
Although Allied intelligence had detected the presence of the 352nd Infantry Division at Omaha Beach only a few weeks before D-Day, only one battalion from this unit (and one battalion from the 716th Infantry Division) were in place to defend Omaha on June 6th. The 352nd's remaining 9 battalions were stationed far beyond the beach defenses.
Following the initial success of the Germans defense of Omaha, the 352nd did not reinforce the beach, but instead moved to the east to fight against the progress made by British and Canadian troops.
The beach itself was divided into 10 sectors:
- Able Sector*
- Baker Sector*
- Charlie Sector
- Dog Green Sector
- Dog White Sector
- Dog Red Sector
- Easy Green Sector
- Easy Red Sector
- Fox Green Sector
- Fox Red Sector
In order to assist incoming landing craft to land on their appropriate sector of the beach, a few small vessels were stationed off of Omaha Beach and used buoys and signal flags to identify beach sectors.
(*No troops were landed in Able and Baker sectors and these sectors are rarely ever mentioned or noted on most maps.)
Beach
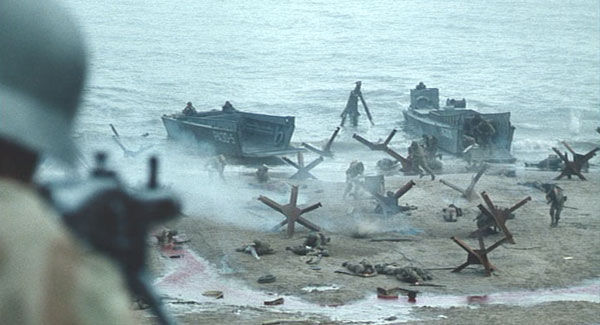
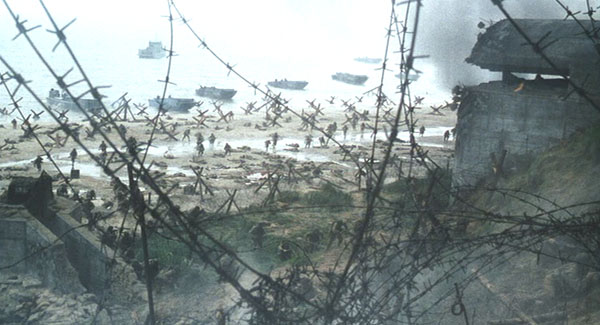
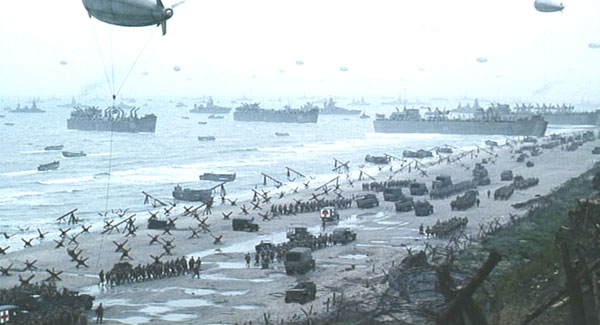
From below the low tide line up to the high tide line a variety of beach obstacles were put into place by the Germans. Layers of Element C (Belgian gates), mines, hedgehogs, wooden ramps and other makeshift defenses presented numerous obstacles for landing craft approaching the beaches, as did natural terrain features such as sandbars. Allied assault forces were due to land at low tide so that most of these obstacles would be visible for demolition teams to destroy. The depth of the beach varied from 300 to 400 yards.
Shingle
A short distance above the high tide mark was a collection of smooth stones anywhere from one to three meters high. The shingle represented minimal cover for troops, but would later cause problems with the movement of vehicles onto the beach.
Seawall
On the western portion of Omaha Beach, just behind the shingle, was a seawall constructed of wood and concrete.
Shelf
Between the seawall and the cliffs, a shelf ran for a depth of approximately 200 yards. A road ran between the draws at Dog One and Fox One, and over this area the Germans placed concertina wire and minefields.
Bluffs / Cliffs / Draws
The final physical barriers were the bluffs, which were up to 30 meters high, and the 200 meter high cliffs on either end of the beach. The obvious means of passing through the cliffs were the five heavily defended beach exits, known as draws. These ranged from paved roads to dirt paths.
Plateau / High Ground
The Germans constructed 15 "resistance nests" (Widerstandnester 60–74) on the plateau behind the bluffs and in these were placed artillery and machine guns aimed to fire on the beach itself. These positions were designed to support each other with interlocking fire, and to cover virtually every yard of the beach. They were connected by trench systems to allow for the rapid movement of troops between defensive positions, and were protected by barbed wire and minefields.
In addition to the resistance nests, a variety of pillboxes and Tobruks were also in place, each holding lighter weaponry such as mortars and machine guns. These were connected to each other via underground tunnels. A breakdown of the defenses at Omaha Beach:
- 8 concrete bunkers with artillery
- 35 pillboxes
- 4 artillery batteries
- 6 mortar pits
- 18 anti-tank guns
- 35-40 rocket launcher sites
- 85 machine gun sites
- 6 tank turrets
June 6, 1944
The carefully constructed plans of the Operation Overlord designers fell apart quickly. The bombing of German fortifications at Omaha Beach by 450 B-24 Liberator bombers had failed, with all of the ordnance landing well behind the beach. In order to avoid hitting their own troops because of low light and overcast conditions, bomber crews had opted to err on the side of safety. Together with the low-yield bombs that had been chosen to avoid cratering the beaches and preventing vehicles from operating, the bombing on Omaha Beach had little effect.
Pre-landing naval gunfire by 18 warships and various landing craft outfitted with rockets and guns was also ineffective. The German positions were well-camoflauged and protected, and the early morning light made it difficult to spot and correct naval fire. The naval bombardment began at 5:50 a.m. and ended at 6:30 a.m.
The DD tanks of the 741st Tank Battalion encountered difficulties getting ashore, while the 743rd Tank Battalion was able to land its tanks directly on the beach.
The coxswains of the various landing craft had major problems in landing their craft at their assigned locations. Tidal currents pulled many of the units eastward and off of their planned landing spots, which when combined with the severity of casualties to officers and NCOs, created a great deal of chaos among the landed troops. Many landing craft never made it to shore, either being destroyed by mines, or sinking in the choppy waters of the English Channel.
As units landed they were immediately met with artillery shells, mortars, machine guns and small arms fire. A great many landing craft were unable to make it to the beach, and heavily-loaded soldiers were often forced to wade ashore under intense enemy fire. Already seasick from the trip across the channel, and with their officers dying and their plans in disarray, the men at Omaha Beach faced a daunting task. Overlord planners had thought that Omaha Beach was lightly defended, and had not planned on the presence of the German 352nd Infantry Division.
The most deadly area of Omaha Beach was Dog Green Sector, which stood in front of Dog One, a beach exit that lead to the village of Vierville. Men of the 116th Regimental Combat Team of the 29th Infantry Division incurred significant casualties at Dog Green. So difficult were the conditions at Dog Green that the commander of the 5th Ranger Battalion, whose forces were to land at Dog Green in a later wave, altered his course to land most of his troops at Dog White Sector. On no other beach would the Allied forces face the slaughter that occurred at Omaha.
In spite of these problems, the scattered units that survived quickly began to take stock of the situation and began organized efforts to attack the beach defenses and move inland. Through individual leadership, training and perseverance, the men at Omaha were able to break through the German defenses by the end of the day.
See 2nd Ranger Battalion and Company C (2nd Ranger Battalion) for more information on Ranger activities on D-Day.
Fact vs. Fiction
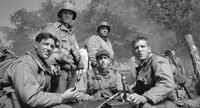
Although the opening sequences of Saving Private Ryan do not give a completely accurate description of the events at Omaha Beach, they do provide an excellent feel for what conditions on the beach must have been like. The running time of the movie required that the attack on Omaha be considerably condensed. Even an entire three-hour movie on just the attack on Omaha Beach would have been hard-pressed to tell the whole story.
It is interesting to note that Charlie Sector of Omaha Beach is often left off of many maps depicting Omaha Beach, and that two other sectors, Able and Baker, also existed but are very rarely ever mentioned or referenced.
Notes
The location used for the Omaha Beach scenes in Saving Private Ryan was located in County Wexford, Ireland near the town of Curracloe. Great care was taken to assure that the beach was returned to a natural state once filming was complete.